Category

Residential Inspections

Master the Art of Foundation Care: A Homeowner’s Guide to Controlled Watering

By Commercial Inspections, Residential Inspections

Welcome to the exciting world of foundation care! Okay, maybe it’s not that thrilling, but taking care of your home’s foundation is crucial. Today, we’re diving into a topic that’s essential for every homeowner: a controlled watering program. Trust us, your foundation will thank you!

Why Should You Care About Your Foundation?

Imagine your home’s foundation as its backbone. Just like how we need a sturdy spine to stand tall, your house needs a solid foundation to stay upright and safe. The trick to a happy foundation lies in understanding expansive soils, which are just like sponges. They swell up when they absorb water and shrink when they dry out. This constant expanding and contracting can make your house move up and down like a seesaw. Not fun, right?

If this movement isn’t too extreme, it might not be a big deal. But if your house starts playing trampoline, you could end up with cracks and other issues. Luckily, you can prevent this with a simple controlled watering program.

The Magic of Controlled Watering

So, what’s the big secret? It’s all about keeping the soil moisture under your house consistent. Here’s how you can master this magic trick:

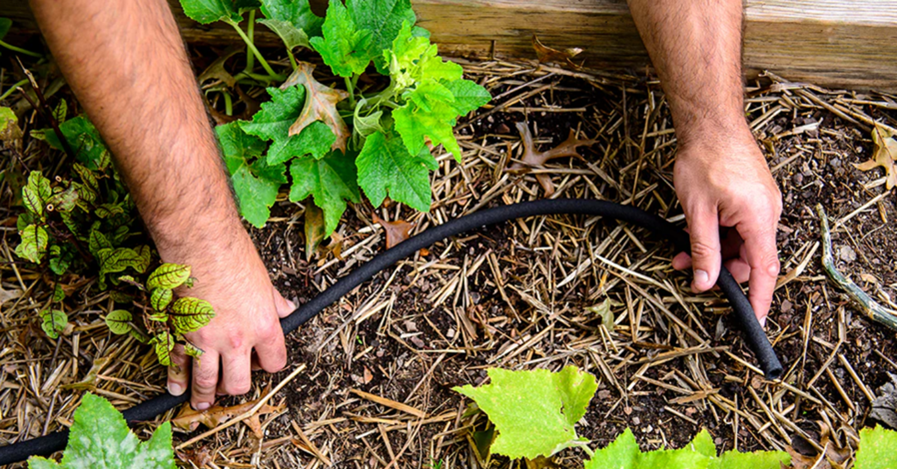
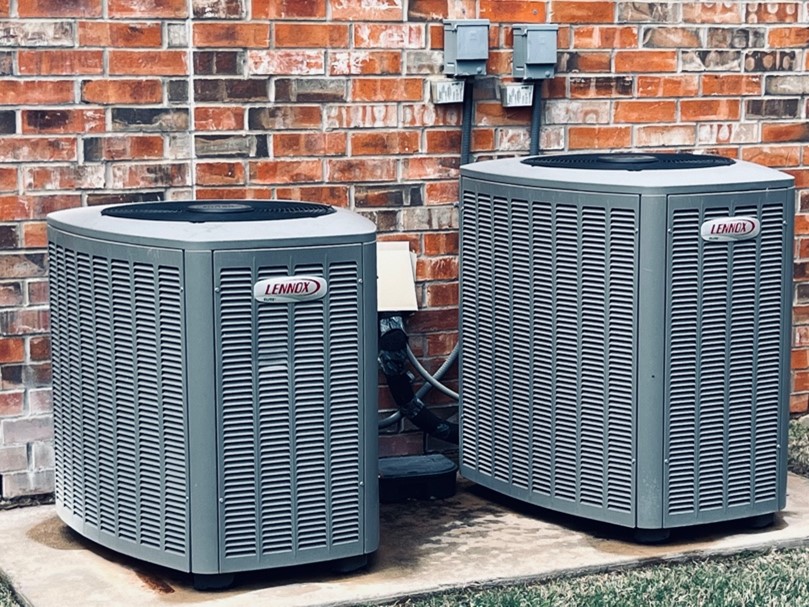
  1. Perfect Placement: Start with a soaker hose, placing it one to two feet away from the edge of your foundation. This helps the water seep evenly into the soil. Pro tip: Don’t snuggle the hose up against the foundation—it needs a bit of breathing room!
  2. Even Soaking: When soil dries out, it cracks. Water can then travel through these cracks and gather at the bottom of the foundation, making the soil lose its strength. Keep the soil evenly moist to avoid this problem.
  3. Seasonal Adjustments: Just like your wardrobe changes with the seasons, your watering habits should too. During the hot, dry summer months, you might need to water your foundation daily. Trees and shrubs around your home can drink up a lot of water, so make sure they aren’t stealing it all from your foundation. In the cooler, wetter seasons, scale back watering to prevent waterlogging.

Why Bother?

You might be thinking, “Do I really need to worry about this?” The answer is a resounding yes! Keeping your foundation in tip-top shape can save you from costly repairs down the line. Plus, a stable foundation means fewer worries about cracks and structural issues.

Think of it as an investment in your home’s future. A little effort now can pay off big time later.

Watering Wisely

Here are some practical tips to keep in mind:

  • Summer Lovin’: When the weather is hot and dry, water your foundation every day if needed. Make sure the moisture reaches deep into the soil, not just the surface.
  • Winter Chill: In the colder months, reduce your watering frequency. The soil doesn’t need as much water, and you want to avoid any risk of water accumulating and weakening your foundation.
  • Best position for this hose: 20 to 24 inches away from the side of your building. You should never try to water a foundation directly. If cracks have already formed, the water will flow through them, collecting under the grade beam. This is the thickest part of the foundation, providing most of the load support. Once the soil underneath is saturated, it loses some of its load-bearing capacity. This can cause your foundation to shift more, making the problem worse. Moving the hose further away guarantees the water will percolate through the surrounding soil, spreading out expansion.

Balancing the benefits of a stable foundation against a slightly higher water bill is a small price to pay for peace of mind. Your home’s foundation will be rock solid, and you’ll sleep better knowing you’ve done everything to keep it that way.

If you’ve got questions or need more tips, ARIEL Inspection is here to help. We’re your go-to experts for all things foundation-related, and we’re always ready to lend a hand.

Stay tuned for more handy homeowner tips and tricks. Your foundation will thank you, and so will your future self!

Happy watering! Contact us for any inspection needs.

Roof Inspection After a Major Storm: Protecting Your Investment in the Dallas-Fort Worth Metroplex

By Residential Inspections, Uncategorized

In the wake of the recent major storm that swept through the Dallas-Fort Worth Metroplex, homeowners and commercial property owners are left with the daunting task of assessing potential damage to their roofs. Storms of this magnitude can cause significant damage, from dislodged shingles to structural impairments, making a thorough roof inspection crucial.

Before you open the door to the next roofer knocking, it’s essential to understand the condition of your roof and know what options are available if repairs or replacements are necessary. ARIEL Inspection can help take the worry out of this process by providing an unbiased inspection report that is not tied to any roofing company trying to pressure you into costly replacements.

The Importance of Post-Storm Roof Inspections

Identifying Hidden Damage

Storm damage isn’t always immediately visible. High winds, hail, and flying debris can cause subtle but significant damage that may lead to leaks and structural issues down the line. An expert inspection can uncover these hidden issues before they escalate into more costly repairs.

Insurance Claims

An accurate and detailed inspection report is invaluable when filing an insurance claim. Insurance companies require clear evidence of damage to process claims efficiently. ARIEL Inspection provides comprehensive reports that meet insurance company standards, ensuring you have the documentation needed to support your claim.

Avoiding Scams and Pressure Sales Tactics

After a storm, it’s common for roofing companies to canvass neighborhoods, offering free inspections and pushing for immediate repairs or replacements. While some may be legitimate, others might use high-pressure tactics to sell unnecessary services. By obtaining an independent inspection from ARIEL Inspection, you can make informed decisions based on unbiased assessments, avoiding the risk of being pressured into premature or unnecessary work.

ARIEL Inspection: Your Trusted Partner

State-of-the-Art Technology

At ARIEL Inspection, we use the latest infrared and high-resolution drone technology to conduct thorough roof inspections. Our advanced equipment allows us to capture detailed images and identify issues that might not be visible to the naked eye. This technology ensures a comprehensive evaluation of your roof’s condition, providing you with the most accurate information possible.

Comprehensive Inspection Reports

Our inspection reports are detailed and easy to understand, including high-resolution images and infrared data that highlight areas of concern. These reports are not only useful for your records but are also designed to meet the requirements of insurance companies, streamlining the claims process.

Unbiased Evaluations

As an independent inspection service, ARIEL Inspection has no affiliations with roofing companies. Our goal is to provide you with an honest assessment of your roof’s condition without any ulterior motives. This impartial approach ensures that you receive a fair and accurate evaluation, allowing you to make informed decisions about necessary repairs or replacements.

Steps to Take After the Storm

  1. Schedule an Inspection: Contact ARIEL Inspection to schedule a comprehensive roof inspection as soon as possible.
  2. Review the Report: Once the inspection is complete, review the detailed report to understand the extent of any damage.
  3. File an Insurance Claim: Use the inspection report to support your insurance claim, ensuring you have the necessary documentation to expedite the process.
  4. Find a Qualified Roofer: If repairs or replacements are needed, use the information from the inspection report to find a reputable and qualified roofer. Avoid making hasty decisions based on pressure from unsolicited contractors.

In the aftermath of a major storm, ensuring the integrity of your roof is critical to protecting your property and investment. ARIEL Inspection offers a reliable and unbiased solution for assessing storm damage, providing you with the peace of mind and confidence needed to navigate the repair process. Don’t let the aftermath of the storm leave you vulnerable—contact ARIEL Inspection today and take the first step towards restoring and safeguarding your home or commercial property.

For more information or to schedule an inspection, contact us or call us direct (972) 400-5800 Let us help you protect your roof and your peace of mind

How Hail Damages Solar Panels and When to Replace

By Residential Inspections, Uncategorized

As a homeowner or commercial customer with solar installations, understanding the potential for hail damage and knowing when to replace your panels is crucial for maintaining the efficiency and longevity of your solar energy system. Whether you have a rooftop array or a dual-axis solar tracker, this article will guide you through the essentials.

How Hail Damages Solar Panels

Solar panels are designed to withstand a variety of environmental conditions, including hail. However, the severity of hailstorms can sometimes exceed the durability of even the most robust panels.

Impact Damage:

  • Glass Breakage: Hailstones, particularly those larger than 1 inch in diameter, can crack or shatter the tempered glass covering solar panels. This can expose the internal components to further damage from the elements.
  • Cell Fractures: The impact from hail can also cause micro-fractures in the solar cells themselves, reducing their ability to convert sunlight into electricity efficiently.

Surface Erosion:

  • Over time, even smaller hailstones can erode the surface of the panels, wearing down protective coatings and reducing their overall efficiency.

Encapsulation Compromise:

  • The encapsulant layers that protect the solar cells can be compromised by repeated impacts, leading to moisture ingress and further degradation of the panels’ performance​ (Energy Theory)​​ (Durability Matters)​.

When to Replace Solar Panels

Knowing when to replace damaged panels is key to maintaining a productive solar installation. Here are the signs that indicate it’s time to replace your panels:

Visible Damage:

  • Cracked or Shattered Glass: If the glass on your panels is cracked or shattered, it’s often best to replace them to prevent further damage to the internal components.
  • Bent or Damaged Frames: Severe hail can dent or bend the frames of solar panels, which can affect the alignment and efficiency of the entire system.

Performance Drop:

  • Reduced Energy Output: A noticeable drop in energy production can indicate internal damage. Monitoring your system’s output through your inverter or energy management software can help detect such issues.

Moisture Ingress:

  • Delamination: If you notice delamination, where the layers of the panel start to separate, it’s a sign that the encapsulant has been compromised, often due to impacts and subsequent moisture ingress.

Safety Concerns:

  • Electrical Hazards: Damaged panels can pose electrical hazards, such as short circuits or potential fire risks. Safety should always be a priority, and replacing compromised panels is essential.

Specific Considerations for Dual-Axis Solar Trackers

For those utilizing dual-axis solar trackers, the impact of hail can be slightly different:

Movement Mechanism:

  • Dual-axis trackers have more moving parts, which can be affected by the physical impact of hail. Ensuring these components are free of damage is crucial for maintaining optimal alignment and efficiency.

Increased Exposure:

  • Trackers, especially those positioned in open fields, might be more exposed to severe weather than rooftop arrays. Regular inspections post-hailstorm are essential.

Apply a Methacrylate Coating

Methacrylate acts as an effective guard against light hail impact. Applying a layer of this coating can limit damage to solar panel modules while still allowing light through.

Ensure Hail Damage Is Covered by the Warranty or Insurance

Many solar panel modules have warranties, but not all cover hail damage. Investing in solar panels with the best warranty against hail can reduce replacement costs in the event of hail damage. However, home insurance with adequate hail damage cover will probably be the best bet long term.

Choose Hardy UL 61730 or IEC 61730 Rated Panels

The best quality-manufactured solar panels generally get tested for hail resistance. However, the type of test, testing company, and results vary. Look for solar panels rated UL 61730 (North America) or IEC 61730 (International), as these are currently the most rigorous hail testing standards. Solar panels that earn these ratings can generally withstand hailstones sized 1-3″ at speeds of 16.8-88.3 mph.

Power Demands:

  • Systems operating large-scale equipment, such as pivot irrigation systems, rely heavily on consistent power. Ensuring your panels are fully functional is crucial for these high demand applications​ (Durability Matters)​.

Hail can pose a significant threat to both residential and commercial solar installations. By understanding how hail damages solar panels and knowing the signs that indicate replacement is necessary, you can ensure the longevity and efficiency of your solar energy system. Regular inspections and timely replacements not only protect your investment but also ensure continued performance and safety. For tailored advice and solutions, consider consulting with a professional solar technician who can provide a detailed assessment based on your specific installation.

For more information on maintaining and protecting your solar panels, contact our team at Solartron. We’re here to help you maximize the lifespan and efficiency of your solar energy system.

Thinking of a New Roof – Inspectors Recommend Ridge Vents

By Commercial Inspections, Residential Inspections, Uncategorized

Roof ridge vents offer several advantages over power vents or fixed vents for residential homes:

Passive Ventilation: Ridge vents operate passively, relying on natural convection currents to draw hot air out of the attic space. This means they don’t require any electricity to function, unlike power vents which rely on motors. This can lead to energy savings and reduced utility costs.

Uniform Ventilation: Ridge vents run along the length of the roof’s peak, providing continuous ventilation across the entire attic space. This helps to ensure more uniform airflow compared to individual fixed vents, which may be unevenly distributed or less effective in certain areas of the attic.

Aesthetic Appeal: Ridge vents are often designed to blend in with the roofline, making them less obtrusive and more visually appealing compared to power vents, which typically protrude from the roof and may detract from the home’s appearance.

Weather Resistance: Ridge vents are generally more weather-resistant than other types of vents, as they are installed along the highest point of the roof and are less susceptible to wind-driven rain or snow infiltration compared to roof-mounted power vents.

Quiet Operation: Since ridge vents operate passively, they produce minimal noise compared to power vents, which can be quite loud when the motor is running. This can contribute to a quieter and more comfortable living environment.

Low Maintenance: Ridge vents typically require minimal maintenance once installed properly. Unlike power vents, which have moving parts that can wear out or require periodic servicing, ridge vents simply provide a continuous opening for ventilation without the need for regular upkeep.

Effective Heat Dissipation: By venting hot air out through the highest point of the roof, ridge vents help to dissipate heat buildup more effectively, reducing the temperature inside the attic space. This can help prolong the lifespan of roofing materials and prevent moisture-related issues such as mold and mildew growth.

Overall, roof ridge vents offer a cost-effective, low-maintenance solution for attic ventilation that provides consistent airflow and contributes to improved energy efficiency and indoor comfort in residential homes.

Call ARIEL Inspection & Engineering for an independent consultation.

Inspecting your Residential HVAC

By Residential Inspections, Uncategorized

Inspecting a residential HVAC system requires a thorough evaluation of various components to ensure proper functionality, efficiency, and safety. No matter who you hire to service and inspect your system they should provide you an overview of their findings when completed.

New systems should be serviced a minimum of once a year; systems greater than 5 years old we recommend a bi-annual inspection. (One in the fall to be ready for winter weather and to ensure the furnace is in top condition and once in spring to be ready for the blistering weather we enjoy here in Dallas-Fort Worth during summer).

Here’s a detailed inspection checklist:

Outdoor Unit (Condenser):

Visual Inspection:

  • Check for any physical damage to the condenser unit, such as dents or corrosion.
  • Ensure that the unit is level and securely mounted to the ground or concrete pad.
  • Remove any debris, leaves, or vegetation around the unit that could obstruct airflow.

Condenser Coils:

  • Inspect the condenser coils for dirt, debris, or signs of corrosion.
  • Clean the coils using a soft brush or coil cleaner if necessary to improve heat transfer efficiency.

Fan Motor and Blades:

  • Check the condition of the fan motor and blades for wear and tear.
  • Lubricate the fan motor bearings if applicable.
  • Ensure that the fan blades are clean and free of debris.

Electrical Components:

  • Inspect electrical wiring and connections for signs of wear, damage, or corrosion.
  • Check the condition of the contactor, capacitor, and relay switches.
  • Test electrical components for proper voltage and current flow.

Refrigerant Levels:

  • Measure refrigerant pressure and temperature to ensure proper levels.
  • Check for refrigerant leaks using a leak detector or soap solution.
  • Recharge refrigerant if levels are low and repair any leaks if found.

Indoor Unit (Air Handler or Furnace): (Usually in the Attic)

Filter:

  • Inspect and replace the air filter if dirty or clogged.
  • Recommend using a high-efficiency filter for improved indoor air quality.

Evaporator Coil:

  • Inspect the evaporator coil for dirt, dust, or debris buildup.
  • Clean the coil using a foaming coil cleaner or professional coil cleaning solution if necessary.

Blower Motor and Assembly:

  • Check the blower motor and fan assembly for proper operation.
  • Lubricate motor bearings if applicable.
  • Inspect blower wheel for balance and cleanliness.

Ductwork:

  • Inspect ductwork for leaks, damage, or signs of deterioration.
  • Seal any leaks or gaps in duct joints using duct tape or mastic sealant.
  • Ensure that ducts are properly insulated and supported.

Safety Controls:

  • Test safety controls such as limit switches, pressure switches, and flame sensors for proper operation.
  • Verify that the thermostat is functioning correctly and accurately controlling temperature settings.

Combustion System (for Furnaces):

  • Inspect burner assembly for rust, corrosion, or debris buildup.
  • Check for proper ignition and flame sensor operation.
  • Ensure that the flue pipe is securely connected and properly vented to the exterior.

Condensate Drain:

  • Inspect the condensate drain line for clogs or blockages.
  • Clean the drain line and condensate pan if necessary to prevent water overflow or damage.

Overall System Performance:

  • Run the HVAC system through a complete heating and cooling cycle.
  • Monitor temperature differentials between supply and return air.
  • Check airflow from vents for proper volume and temperature.
  • It’s important to note that while this checklist covers many aspects of a residential HVAC system inspection, it may not cover every potential issue. It’s always recommended to consult with a licensed HVAC professional for a comprehensive inspection and any necessary repairs or maintenance tasks. Additionally, regular maintenance and servicing of the HVAC system are essential for extending its lifespan and ensuring optimal performance and efficiency.

HVAC Filter Selection – Air Quality, Your Health and Comfort

Let’s discuss air quality inside your home. Those with difficulty breathing due to illness or allergies will want to read more about MIRV rating prior to selecting a filter for your home.

MERV (Minimum Efficiency Reporting Value) ratings are used to measure the effectiveness of air filters in capturing airborne particles. The higher the MERV rating, the more efficient the filter is at trapping particles. However, the recommended MERV rating for a home HVAC system depends on several factors, including the system’s capabilities, indoor air quality needs, and specific requirements.

ARIEL suggests you consider that in Texas the winds blow in pollen from the trees and prairies year-round. Due to the weather, most Texans keep doors and window shut most of the time which means these pollens are trapped along with other pollutants from cooking, and your home’s furnishings. Newer homes are being built much tighter than years ago with a need to bring in outside air via the HVAC system to ensure a healthy amount of outside air is added daily to ensure good indoor air turnover.

Here are some general guidelines:

MERV 8-11:

  • Suitable for most residential HVAC systems.
  • Provides good filtration for capturing dust, pollen, pet dander, and larger particles.
  • Balances effective filtration with minimal airflow resistance, ensuring efficient system operation.

MERV 12-13:

  • Provides enhanced filtration for homes with occupants who suffer from allergies, asthma, or respiratory conditions.
  • Captures smaller particles such as mold spores, fine dust, and some bacteria.
  • May require periodic filter replacement to maintain airflow and system efficiency.

MERV 14-16:

  • Offers high-efficiency filtration for homes with specific air quality concerns, such as severe allergies or respiratory sensitivities.
  • Captures very small particles, including smoke, viruses, and bacteria.
  • Requires regular filter replacement and may increase energy consumption due to higher airflow resistance.

It’s important to consider the following factors when selecting the appropriate MERV rating for your home HVAC system:

System Compatibility: Ensure that the selected MERV rating is compatible with your HVAC system’s airflow capacity. Using a filter with a MERV rating that is too high can restrict airflow and strain the system, leading to reduced efficiency and potential damage.

Indoor Air Quality Needs: Assess your indoor air quality needs, including any specific concerns or sensitivities related to allergies, respiratory conditions, or indoor pollutants. Choose a MERV rating that provides adequate filtration for your household’s requirements.

Filter Replacement Schedule: Higher MERV-rated filters may require more frequent replacement to maintain airflow and system performance. Consider the cost and convenience of filter replacement when selecting a MERV rating.

Professional Advice: Consult with a qualified HVAC technician or air quality specialist to determine the most suitable MERV rating for your home HVAC system. They can assess your specific needs and recommend the appropriate filter for optimal indoor air quality and system efficiency.

Overall, selecting the right MERV rating for your home HVAC system involves balancing filtration effectiveness, system compatibility, and indoor air quality requirements. Choose a MERV rating that provides the desired level of filtration without compromising system performance or energy efficiency.

Preparing Your Home for Spring Weather

By Residential Inspections, Uncategorized

Whether you live in Dallas or Houston, Tyler or Ranger, spring and summer is the most common times for severe weather threats to strike. North Texas.

Here are some ideas to make sure your home and your family are prepared. Before storms make sure you have a list of things to do now to help protect your home against dangerous summer weather.

Avoiding Roof Damage

Cut back overhanging limbs from the roof line at least 12 feet.

Cut down any trees that have died due to the severe cold from last February 2021 that could easily fall with high winds and slam against your house.

If you keep any cars parked outside, be wary of surrounding trees, as old trees can lose limbs easily with heavy winds and torrential rain. Dead or rotting trees also attract lightning.

Tie Down Loose Objects

Be on the lookout for items that can easily blow away or damage your home like outdoor furniture, toys and backyard playground equipment. And don’t forget about potted shrubbery on patios and near windows. Stake down the larger items and bring in all that are moveable before a thunderstorm storm hits. Otherwise, gusty winds could lift them off the ground and turn them into dangerous projectiles. (And new indoor accessories!).

Keep Tools Handy

Gather together tools like hammers, wrenches, screwdrivers and pliers, and keep them in an easily accessible place. If severe weather strikes, causing your home utility damage, you may need to shut off your electricity, gas, or even your water to prevent additional damage. Having these tools nearby will make this easier.

Family Safety

Don’t forget about your pets and indoor animals swimming or slithering near windows that might be injured by broken glass.

Have a “safe room” to gather in case of tornados to gather your family. General and inside closet adjacent to a bathroom or the bathroom can be used as well.

Stock your room with snacks and water. Keep some old coats, blankets and ponchos handy. Charger for cell phones, pry bar and axe.(you might need to beat feet quickly).

Extra batteries and working flashlights.

Keep phone numbers handy for local electric and gas utilities in case of outages that need reporting to restore your power or if dangerous conditions are present like downed lines or gas leaks.

… And remember

We know the storm will pass, the sun will come out… and with these few precautions you and your family will be safe.

SURVIVING THE WINTER FREEZE OF 2021-22?

By Commercial Inspections, Residential Inspections, Uncategorized

PREVENTATIVE STEPS TO TAKE TO PROTECT YOUR HOME

Last year’s deep freeze caused issues for many of our neighbors which ranged from minor leaks to catastrophic damage.  I am sure everyone has their fingers and toes crossed that we don’t have a repeat of that weather anytime soon.  Below are some ideas to help everyone be more prepared.

Some people are saying that this is a once in a lifetime event, but I can assure you it isn’t.  While the temperatures we experienced are rare this is the 3rd time since 1988, we have seen extremely low temperatures.  The reality of the situation is that we could experience another deep freeze at any time.   An occasional low temperature is not normally an issue, but problems occur when we hit below 20 degrees F for several consecutive days.

Some neighborhoods had 3 main areas of impact

  1. Fire Sprinklers systems – these are only in the newer homes built by Perry Homes
  2. Pipes leading to outside faucets in outside walls  
  3. Waterpipes in unheated attics or garage ceilings 

There are things you can all do to reduce your risk repeat of last February 2021.

If your house is going to be vacant for an extended period, you may want to consider turning off the water to the house.  Everyone should have a water valve that allows you to do this. You can also turn water off at the meter but if you have fire sprinklers you should never turn your water off at the meter because it also turns off the water supply to the fire sprinklers.

If the water supply to the fire sprinklers is shutoff you could void your insurance coverage if there is a fire.   

Water pipes in unheated areas/ Outside hose faucets 

Typically, the heat from your living space in your house will help keep the attic warmer than the outside temperatures but there are limits. The difference is usually around 15-20 degrees in the winter, but differences can be larger during extreme cold weather.  An inexpensive remote temperature sensor/alarm can help you keep an eye on your attic temperature – this is important if you have water pipes in the attic.   Attics should be kept around 60 degrees F to avert pipes bursting.

Some of us have water regular water heater or tankless water heaters installed in the attic. The water heaters require pipes be installed in the attic to feed them water and distribute it after it is heated. If it gets cold enough the cold can impact the pipes running to the water heaters even if they are insulated.  The suggestion of opening the attic stairs and cranking up the heat to the maximum worked for everyone who did this.

For those who have water heaters in the attic opening the stairs is the easiest solution but there are other solutions too:

  • Install an electronic damper on one of your furnaces that would allow you to direct hot air from your furnace directly into the attic.  You should consult a Heating and A/C specialist about this option.
  • Seal and insulate the attic with foam – this also keeps the house cooler in the summer, but it is an expensive option
  • Set up a recirculating loop that circulates hot water through you pipes in the attic.

If your water heater is in the garage, pipes may be in the ceiling or walls of the garage that can burst if they freeze.  Pipes running to outside facets may also be located in unheated garages. A few things that can help are:

  • Be sure your garage door is insulated. This can make a big difference in both summer and winter.
  • Heat the garage in extremely cold weather.  There are electric space heaters or panel heaters you can purchase that can keep you garage warmer.  You don’t need to keep the garage as warm as the house but if you can maintain 40 degrees you should be good.  When considering a heater keep in mind that most garages are about 400 sq ft.   Use only am electric heater due to potential issues with carbon monoxide when using other heater fuels.
  • Set up a recirculating loop that circulates hot water through the water pipes

The outside faucets are typically designed so they cannot freeze but for this feature to work it is critically important that there are no hoses are attached to the outside faucets. If a hose is connected it keeps water in the pipe which negates the anti-freeze technology.  The pipes that burst leading to the faucet were not insulated very well or they were in unheated garages that got very cold.  In addition to the above there are a few more things you can do to reduce the potential for freezing.

  • Cover all outside faucets with foam faucet covers 
  • Install a shutoff valve on the water line that supplies the outside faucet. This should be place in a heated area because if you don’t do this the line could still freeze and the valve might not work.  If you have a cutoff valve, be sure to leave the faucet open so any water in the pipe drains out.
  • Install a pipe heating cable along water pipe leading to the outside faucet.  This is basically a heating element that runs along the pipe to keep the water above freezing. This option may require you to open your dry wall to access the pipe.

Fire Sprinkler Systems.   

These systems are more complex to deal with but there are several solutions. Last February we saw 3 types of issues.

  1. Backflow assemblies in garages ruptured because they are in unheated spaces, and many are on outside walls – this is the most common issue and causes the least damage.
  2. Pressurized drain lines burst, once again they are in outside walls in unheated spaces.
  3. Pipes in attics froze and burst, by far the most destructive.

There are a few things you can do when we have extreme weather.

  • Heat the areas where the pipes and backflow assembly are exposed to cold air.
  • Replace the water in the system with a special chemical that is designed not to freeze.  This must be done by a professional company that is licensed to maintain fire sprinkler systems. (Glycol mixtures are typical)
  • Drain the system of water.  (NOT ADVISED) This disables your fire protection. Keep in mind should your insurance coverage may be void if you have a fire and it is determined your system was disabled.  Also, this solution does not drain the water out of vertical pipes to which sprinkler heads are attached.  The water in the vertical pipes in an attic can freeze which will cause the pipe to break and fall out of the ceiling.
  • You could also just turn the water off at the backflow assembly. This could protect you from a large flood but again your fire protection is off.  If you choose this option, before you turn the water back on be sure your pressure gauges are not lower than when you shut off the water.  If the pressure drops, while the water is turned off, it usually means a pipe has ruptured.
  • Consider buying a small flat panel ceramic heater and thermal switch that you can attach to the inside of the door that encloses your backflow assembly.  This will keep the backflow assembly and valves from freezing if installed correctly.
  • Regardless of what you do, you should have the “T” tool that is made to turn off the water at your water meter or if you don’t have one you should at least know several people who do have the tool in case you need help.   These are available from local big box retail stores for around $10.

Installing water leak sensors is also a good idea.  They are inexpensive and can alert you as soon as a leak is detected.

The Backflow assemblies do have a flow sensor which can be hooked up to any alarm system. If water flows through the fire sprinkler systems for any reason it will set of the alarm even if there is no fire.

Below is a link to the panel heater I mentioned.  This can be mounted on the backflow assembly door if it is large enough. There may are other models available at different price points.

https://www.amazon.com/gp/product/B08J7Y1T2S/ref=ppx_yo_dt_b_asin_title_o00_s00?ie=UTF8&psc=1 

The following link is for a thermal switch that will also sound and alarm and send a message to your smart phone. You can connect a heater to the device or just use it to send you temperature information.

https://www.amazon.com/gp/product/B07K8MBLSQ/ref=ox_sc_act_title_1?smid=A1RUFFFCQ74BCW&psc=1

The link below is for a space heater that could be used in a garage.

https://www.amazon.com/LIFEPLUS-Adjustable-Thermostat-Overheating-Protection/dp/B08BJ7X2JF/ref=sr_1_30?crid=3FZ7EH7DA62U0&keywords=electric+garage+heater%5C&qid=1640831282&s=home-garden&sprefix=electric+garage+heater%2Cgarden%2C100&sr=1-30

Next link is for water leak detectors:

https://www.amazon.com/s?k=d-link+water+sensor&gclid=Cj0KCQiAq7COBhC2ARIsANsPATGXYcTzpTA3oVGhOBfvdxs4a9Y9-joXz_dSeaZ8QPGVb8U9rHxCwroaAq1OEALw_wcB&hvadid=557163800823&hvdev=c&hvlocphy=9027211&hvnetw=g&hvqmt=e&hvrand=7711699224228224179&hvtargid=kwd-133698028131&hydadcr=14858_13352485&tag=googhydr-20&ref=pd_sl_26671qe10h_e

There are many sources other than Amazon for the above items including Home Depot and Lowes.

Hope this is helpful to all and let’s hope for a winter milder than 2021.

Best,
ARIEL Inspection.